Does anyone have a drawing of this type of pump for bilge water removal? They are common on steamship installations, but those are way too big for my little steam launch.
Thanks in advance for help.
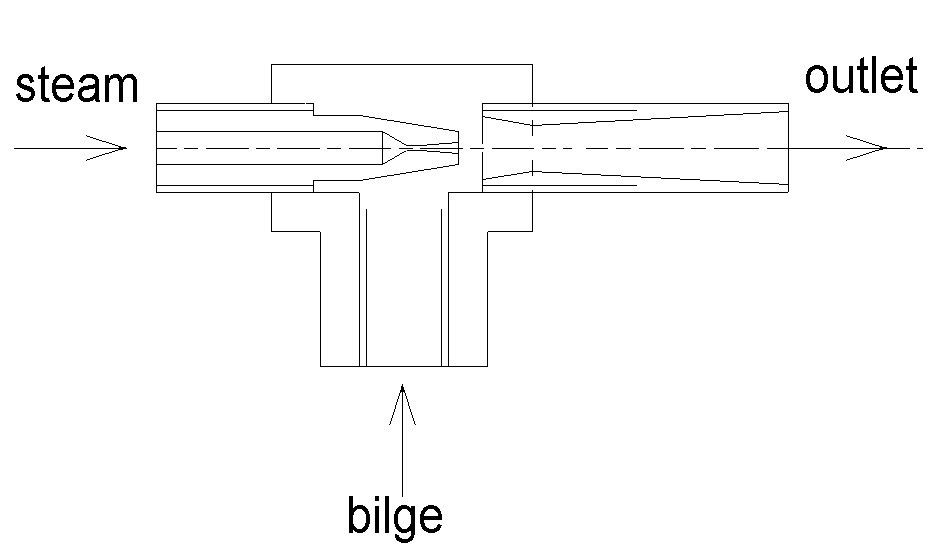
Steam Ejector Bilge Pump
-
gondolier88

- Full Steam Ahead

- Posts: 290
- Joined: Fri Jun 18, 2010 8:54 pm
- Boat Name: No Boat Yet
Re: Steam Ejector Bilge Pump
Have you thought of using an eductor rather than a pump- lighter, quieter and as small or as big as you want. I'm ot convinced that a small enough pump for your launch would cope with the foreign objects that end up in the bilges of small boats.
Greg
Greg
-
daysaver1
- Steam on Deck

- Posts: 49
- Joined: Thu Dec 10, 2009 11:21 am
- Boat Name: No Boat Yet
- Location: Livermore, CA
- Contact:
Re: Steam Ejector Bilge Pump
Although no drawing, the most successful steam ejector pumps I've seen use a simple plumbing "T" configured as 3/4" in one end and 1/2" in both side and other end.
Take a 3/4" plug and drill out the center to accept a 1/8" pipe tight enough at first that you can slide it in and out while testing to get the best results. It must be tight enough so no air can be pulled in around the slide joint. One end of this 1/8" pipe is the "steam in" and the other end of the pipe should be filed (or lathed) so the outside shape is rounded toward the opening, essentially making the "front/exiting" of the pipe almost a sharp round edge, sort of like the shape of a hole punch. The proper final location of this 1/8" pipe will be past the side 1/2" opening and probably be near the 1/2" "out" of the fitting. This is a pure example of the Venturi principle.
The side 1/2" is the "water in" connected to a hose into your bilge. The "water/steam/out" (straight through from the 3/4 in) is connected to a 1/2" hose overboard.
Testing with compressor, with the "in" hose in a bucket of water and the compressor air powering the 1/8" "in", slide the 1/8" pipe in and out gradually till you find the "sweet spot" that will draw either the most water; or to the highest point. When this place is found, epoxy (high temp) or tack the 1/8" pipe to the plug at that place and got to it.
Co-Captain...S.L. Reward
-
87gn@tahoe
Re: Steam Ejector Bilge Pump
My father made a simple one that works quite well out of soldered 3/8" copper tubing, in a "T" configuration similar to what daysaver described.
-
fredrosse

- Full Steam Ahead
- Posts: 1925
- Joined: Fri Nov 20, 2009 5:34 am
- Boat Name: Margaret S.
- Location: Phila PA USA
- Contact:
Re: Steam Ejector Bilge Pump
gondolier88: I believe an eductor uses liquid for the motive fluid, and I want to use steam. There is no source of pressurized liquid to drive an eductor on the boat. I can put a screen on the bilge inlet to keep objects from clogging the ejector.
gondolier88 & 87gn@tahoe: I was hoping to get some dimensions without experiment, but building a trial ejector and messing with the geometry will probably have to be tried.
Thanks to all for replies.
gondolier88 & 87gn@tahoe: I was hoping to get some dimensions without experiment, but building a trial ejector and messing with the geometry will probably have to be tried.
Thanks to all for replies.
-
87gn@tahoe
Re: Steam Ejector Bilge Pump
The one my dad made was just cobbled together and it worked.. lifts about a foot and pumps it another foot before going through the hull fitting. Scrap copper tubing is cheap...
-
steamboatjack
- Full Steam Ahead
- Posts: 283
- Joined: Fri Nov 20, 2009 8:02 am
- Boat Name: grayling
- Location: Cumbria U.K.
Re: Steam Ejector Bilge Pump
I would turn up the steam end rather than use a pipe as the nozzle needs to be only about 1/16 dia. The outlet is best turned also with a divergent taper for best results, leave plenty of threads in the tee piece to tune by trial & error.