New Boilermaker Needs Novice level help on Model M

A special section just for steam engines and boilers, as without these you may as well fit a sail.
CannonFodder
Just Starting Out
Just Starting Out
Posts: 18
Joined: Sun Sep 18, 2016 12:41 am
Boat Name: No Boat Yet

New Boilermaker Needs Novice level help on Model M

Post by CannonFodder »

Hello All,

I am continuing to push forward on my Tiny Power Model M boiler, which is my first boiler ever. I have one other post on this topic and I appreciated your help at that time.

I thought I better keep you guys up-to-speed on what I am doing in case I am beginning to make any bad choices in the build. And I have a few questions for you today.

First, it isn't a real Model M build. I thought I would get myself up to speed with a downsized version and then go into the real Model M with some experience behind me.

Nothing has been permanently welded yet, and here is a stack-up of parts-to-date so that I could eyeball how everything is fitting together.

Image


Here is my first question.

When I reduced the overall size of the M, the steam chest is now a 4" pipe rather than 6". This reduces the amount of real estate for the 3 pipe fittings that the M blueprints call for. My idea for saving space was to weld my downflow assembly rather that use a massive 3/4" tee fitting here in front of the steam chest. The nipple is 1/2" EH and the cross member is 3/4" pipe. Do you think this is okay?

Image

The connection to the water column is on top and leaves just a very small area in between for the feedwater connection. Any ideas?

Image


Thanks in advance!!
User avatar
TahoeSteam
Full Steam Ahead
Full Steam Ahead
Posts: 855
Joined: Fri Mar 07, 2014 5:38 am
Boat Name: Wayward Belle
Location: South Lake Tahoe, CA, USA
Contact:

Re: New Boilermaker Needs Novice level help on Model M

Post by TahoeSteam »

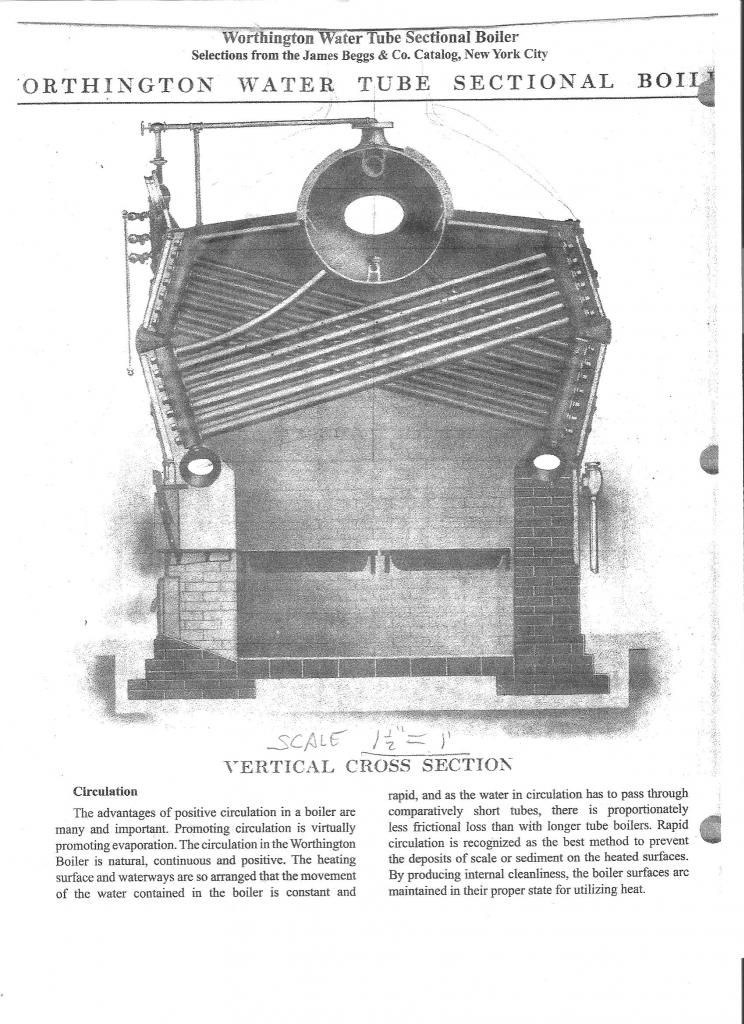
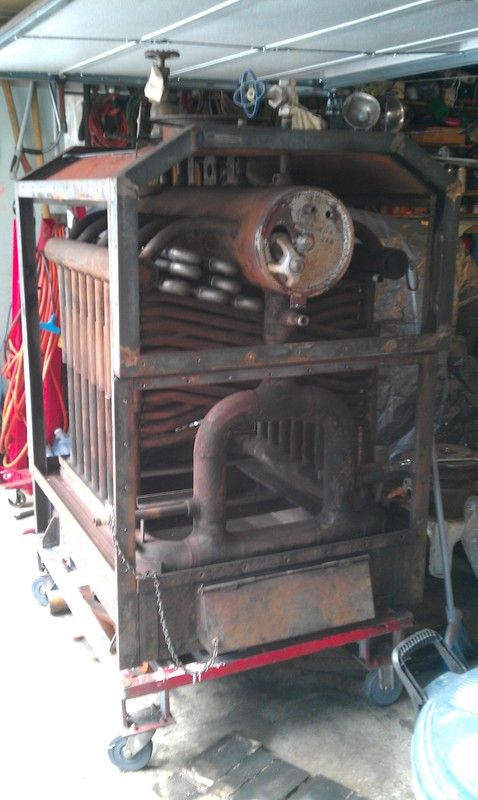
That boiler is loosely designed after the "Wortington patent" boiler. It's a great design with lots of natural circulation. We have a 100sqft version and have steam issuing out of the top boiler drain in about 15 minutes with a lazy wood fire.

Welding it, rather than a pipe fitting is no problem at all, other than being permanent. I would suggest you make the downcomer connection to the boiler the same diameter as the downcomers, if not a bit larger. Remember, they're there to circulate water back down to the mud drums. You don't want a bottleneck there.

Does the original design call for them to come off the end of the steam drum? A low water condition in the steam drum could result in starving the rest of the boiler of water... Less so with them coming directly off the bottom of the steam drum itself.

Happy Birthday by the way!

Image

Image
User avatar
barts
Full Steam Ahead
Full Steam Ahead
Posts: 1088
Joined: Wed Nov 18, 2009 6:08 am
Boat Name: Otter, Rainbow
Location: Lopez Island, WA and sometimes Menlo Park, CA
Contact:

Re: New Boilermaker Needs Novice level help on Model M

Post by barts »

The Worthington boiler is a good design in my opinion and is probably what we're going to use on Sea Lion. The key attributes for me are a dense tube packing that insures good heat transfer and limits overall boiler size, excellent circulation due to the 15 degree angled tubes and proper down comers, and tubes that are well covered with water. It's also practical to fabricate and test each tube section separately so that fabrication leaks can be dealt with while still easily repaired.

I've seen designs with the tubes kept straight as in Cannon Fodder's project, tubes bent as in TahoeSteam's boiler and of course the original design with straight tubes and angled headers. The vertical header designs certainly take less space in the boat, and are practical because these are welded boilers rather than the original design w/ rolled in tubes.

I notice that most of the designs have 6 to 8 tubes vertically. Will four absorb enough heat? I'd certainly plan for ample economizer space/

As to the feed water connection, why not put the feed water into the mud drums?

- Bart
-------
Bart Smaalders http://smaalders.net/barts Lopez Island, WA
CannonFodder
Just Starting Out
Just Starting Out
Posts: 18
Joined: Sun Sep 18, 2016 12:41 am
Boat Name: No Boat Yet

Re: New Boilermaker Needs Novice level help on Model M

Post by CannonFodder »

TahoeSteam and Barts -
Thanks for the great responses, encouragement, and even well-wishes for my birthday!!

Yes, the original drawings do call for that placement of the downcomer, and the original drawings also call for 3/4" pipe in that location. But, in following the original layout of that steamchest end sheet, but making my first boiler about 2/3rds size, I ran out of room. I will think about my options for those downcomers, thanks. The main purpose of this 2/3rd size prototype is to familiarize myself with all the required processes before tackling the real M.

Speaking of experiencing the processes - both the water grate and the upflow elements have tubes about 1/2" apart from each other when entering the larger tubes. It seems to be the very limit of my MIG nozzle to reach to that furthest point on each tube when welding. Any tricks or insights for me anybody? I was picturing doing my best with the MIG, which does beautifully around the rest of the tube, and then "reflowing" the difficult-to-reach part with a torch. Comments???

As for the feedwater inlet configuration, the hole right in the middle of the end sheet, can I cut two pieces of 1/2" EH at 45 degrees and weld up a nice skinny elbow for myself, or is that considered bad practice?

And yes, the original drawing does have 7 cross-tubes in the upflow elements, having only 4 was part of my 2/3rd size effort.

Thanks again,

CannonFodder/ Robert
CannonFodder
Just Starting Out
Just Starting Out
Posts: 18
Joined: Sun Sep 18, 2016 12:41 am
Boat Name: No Boat Yet

Re: New Boilermaker Needs Novice level help on Model M

Post by CannonFodder »

Oh! And thank you very much to SteamTahoe for the photo of your boiler! You have no idea how many good ideas are there for someone who is first starting out. Awesome.
User avatar
barts
Full Steam Ahead
Full Steam Ahead
Posts: 1088
Joined: Wed Nov 18, 2009 6:08 am
Boat Name: Otter, Rainbow
Location: Lopez Island, WA and sometimes Menlo Park, CA
Contact:

Re: New Boilermaker Needs Novice level help on Model M

Post by barts »

Do you have a big MIG welder? The smaller units don't have enough amperage to get proper penetration on these sorts of welds. Normally I'd weld this with a stick (7018 EP if your gear will do DC at 130 amps or so - more for the drum). I usually use 6010 or 6011 for the root pass, grind down to clean, solid metal, and finish w/ a 7018 pass (or two for larger welds).

- Bart
-------
Bart Smaalders http://smaalders.net/barts Lopez Island, WA
User avatar
fredrosse
Full Steam Ahead
Full Steam Ahead
Posts: 1925
Joined: Fri Nov 20, 2009 5:34 am
Boat Name: Margaret S.
Location: Phila PA USA
Contact:

Re: New Boilermaker Needs Novice level help on Model M

Post by fredrosse »

The feed should go into the top drum, the cold feedwater will mix rapidly with the turbulent steam/water mixture, quickly releasing any dissolved O2. An internal feed pipe, directing several feed holes into the drum, should be arranged so that incoming feedwater should not impinge on boiler internal pressure vessel parts. A feedwater connection to the lower mud drums will promote "hideout", where the high density cool feedwater stays low and tends to impede good circulation. The water cooled grate may make this condition OK, but maybe not.

I would recommend about a 3/8 inch (outside diameter) feed tube running about 12 inches long inside the upper drum, with about 10 drilled holes, 1/8 inch diameter each, to distribute the cool feedwater throughout the drum.

Downcomer connection to the upper drum should be at the bottom of the drum. Can you get butt-weld fittings rather than screwed? Screwed cast iron fittings should not be directly exposed to the furnace.

Tube connections at the mud drums can be gone over with an Oxy-Acetylene torch where the MIG might not have had good full fusion. With my low capacity MIG welder I often pre-heat the joints with a propane torch just before welding. I have also made these joints with simple torch brazing, works fine for anything under 250 psi.
CannonFodder
Just Starting Out
Just Starting Out
Posts: 18
Joined: Sun Sep 18, 2016 12:41 am
Boat Name: No Boat Yet

Re: New Boilermaker Needs Novice level help on Model M

Post by CannonFodder »

Thanks FredRosse and Barts!

Yes fittings are problematic. I've been working hard to get those fittings to tighten up just at the right time to facilitate alignment at the next joint! I got it to work (I think, I never did it with pipe dope, only with teflon tape in a mock-up mode) but it still left me with another question -

The blueprints tell me to anneal the entire boiler after welding for stress relief. I couldn't picture the pipe dope making it through two hours of "dull red".

So the continuation of welded joints sounds good to me. For the downcomers I think I'll come out of the steamchest with 1/2" EH (I know there is a question of inadequate flow here), weld that into the 3/4" cross member, the downcomer legs could then be 1" pipe, and these can be welded into the 1 1/2" mudchest. Does that sound OK?

Also, thanks a lot for the welding/brazing tips, that really helps.

New question - If I brazed the water grate, can that go through the annealing process?

Thank you gentlemen,

CannonFodder/Robert
User avatar
barts
Full Steam Ahead
Full Steam Ahead
Posts: 1088
Joined: Wed Nov 18, 2009 6:08 am
Boat Name: Otter, Rainbow
Location: Lopez Island, WA and sometimes Menlo Park, CA
Contact:

Re: New Boilermaker Needs Novice level help on Model M

Post by barts »

Remember that normal bronze brazing alloys don't penetrate gaps well, so leave a generous fillet on the joints. The pressure limit on the steam is because one should never use brazed joints over 200 C; this is why one should never subject such joints to direct radiant heat from the fire unless the tubes are filled w/ water. Since the water grate joints can be subject to heat after blowdown, I'd weld those if at all possible.

I like the idea of preheating the structure if you're going to weld this w/ a MIG welder; one of those $20 propane weed burners from Horror Freight would work very nicely for that.

I would not anneal the structure if you're brazing the joints; in fact, I don't think annealing is all that common for steel boilers.

- Bart
-------
Bart Smaalders http://smaalders.net/barts Lopez Island, WA
User avatar
fredrosse
Full Steam Ahead
Full Steam Ahead
Posts: 1925
Joined: Fri Nov 20, 2009 5:34 am
Boat Name: Margaret S.
Location: Phila PA USA
Contact:

Re: New Boilermaker Needs Novice level help on Model M

Post by fredrosse »

I agree with Bart on these points. I have never seen the thermal stress relief process on welded boilers, and the materials for boiler welded construction require very ductile material (generally low carbon steel), so that thermal distortions will not lead to failure of the pressure vessel parts.

Cast iron can take far less strain displacement (called "plastic deformation"), and it is generally prohibited in most boiler pressure vessel construction. I know small size butt welded steel fittings are made, check out where you can get them.
Post Reply