Page 14 of 39
Re: DetroiTug's Tug is going together
Posted: Tue May 24, 2011 4:36 pm
by artemis
Glad to see you have created a "hatch" above the boiler to install/remove-for-servicing. If your boiler is not installed, you also have a convenient engine install/remove hatch. And if you make it a working hatch complete with coaming, etc. Then a "skirt" around the bottom of the funnel casing with the "skirt" serving as a rain cap to deflect the rainwater/spray away from the base of the funnel, thereby minimizing leakage where the funnel passes through the hatch cover. If the bottom of the skirt is elevated an inch or so above the hatch top and a space (about an inch) left between the hatch cover and the outside of the funnel, then there is both a supply of air and heat expansion space.
I assume that the whistle lanyard goes to the wheelhouse so that the captain can alert the "dozing" engineer.
You missed your calling Ron. You should have been a cabinet worker. The workmanship on the house is first rate!

Re: DetroiTug's Tug is going together
Posted: Tue May 24, 2011 9:54 pm
by DetroiTug
Fred, Ron, Thanks for the compliments
A couple blasts on the whistle in it's present location will keep the engineer watching the sight glass.

I found an old "trolley bell" or "engine room signal bell" or "boxing bell" (They go by several names) a few weeks ago. It needs to be restored, but that will be in the engine room eventually.
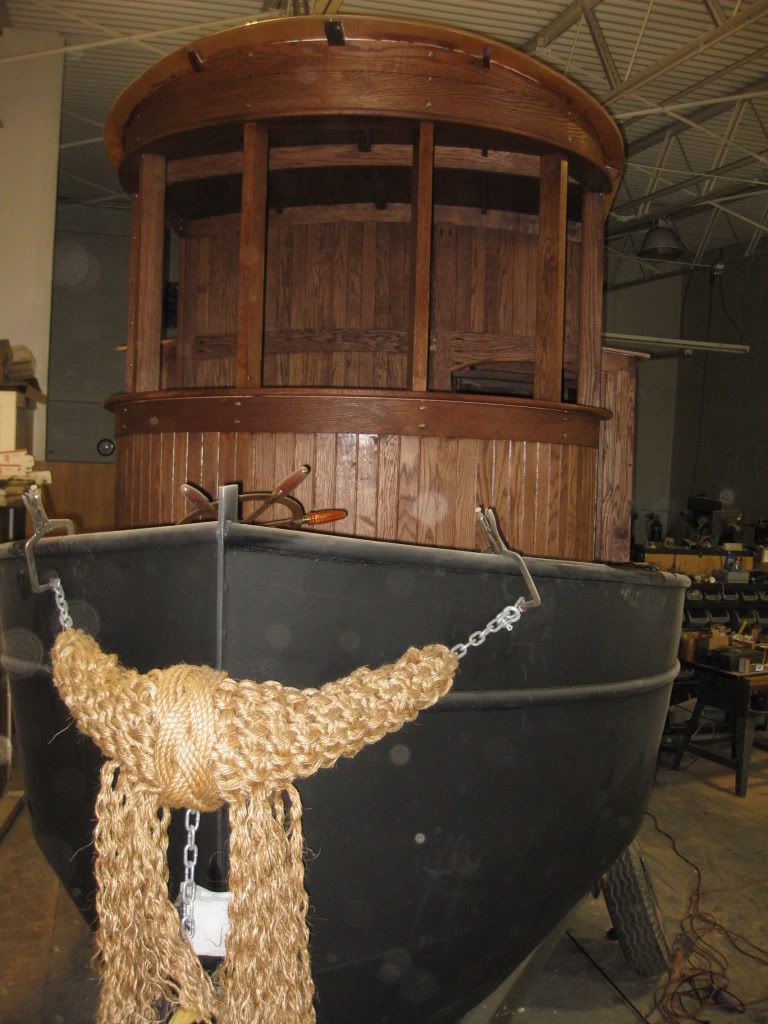
Here is my vision for the funnel and stack, let me know what you guys think.
The opening above the boiler will have a sleeve made 1/8" X 3" flat, that will line the perimeter inside and protrude the roof line ~ 3/4". I will use the existing funnel which reduces down to 6" diameter, that will stick through the opening.
The Stack will be 12" diameter and welded to a rectangular fabricated hood that covers the roof opening(it will also break at the pilot house roof line for towing). The stack/hood will actually be part of the roof and removable for boiler removal, tube cleaning etc. The funnel boiler stack will be standing inside of this. No part of the boiler funnel or stack will be touching anything, with a good air gap in between. Plus, will be exhausting out the stack, so this will create a vacuum at the base of the large stack, pulling air out of and in to the cabin. Plus it will cool the 6" diameter stack. The whistle piping, relief valve standpipe will simply go through the square hood. Sound about right? Which is probably good for summer, if it runs in cold weather, may need to seal off the inside and make louvers on the base of the outer stack for fresh air.
Went and picked up the mahogany for the doors and windows today, the sash cutters sets are here, I'm going to give it a whirl and see how it goes.
Back to the wheelhouse to make upper and lower sills.....
-Ron
Re: DetroiTug's Tug is going together
Posted: Wed May 25, 2011 5:42 am
by farmerden
Sorry Ron I'm always a day short and a dollar behind but here's an old way to hang a window.I can lift two of mine out and then what to do with the window? It seems no matter where I put it ,it's in the way! This set up allows you to lower the window in place but you'll need clearance below the window to do it! Den

[/img]
Re: DetroiTug's Tug is going together
Posted: Wed May 25, 2011 7:40 am
by dhic001
Ron,
Well done on the work so far, a real credit to you. A few thoughts of mine on boiler rooms and hatches, take them or leave them...
I'd make the hatch a conventional wooden hatch on coamings, but hinged at the back to allow you to fold it open to access the boiler or lower the funnel for towing. The outer funel would be welded/bolted to a flange that bolts on to the hatch, with sealable fittings through the hatch for the whistle and safety valve lines. Whistle and safety vales lines would be attached to the funnel, and would join the lines up from the boiler on mach unions under tha hatch.
The inner funnel would be supported on sliding brackets inside the outer funnel, and would be able to be locked into the outer funnel when the hatch is hinged open. This then leaves the smokebox and uptake to the roofline as a piece that is easily removed inside the cabin. I'd probably have a flange on the top of the casepipe, and a flange on the bottom of the inner funnel that you bolt together to form a good seal.
I wouldn't be leaving a gap around the hatch, but would make and fit a pair of large bell mouthed ventilators which are talled than the top of the wheelhouse. Underway these bring a good stream of cool air into the engine room. This way cold air comes down the ventilators, hot air rises up the inside of the funnel. A gap around the hatch is an easy path for water to come in.
Its well worth thinking about running conditions in adverse weather. With a wheelhouse, you can quite comfortably steam in the rain, but you'll want the windows and doors closed, so allow plenty of air from ventilators. I'd also be looking at putting a couple of traditional skylights in to let air in as well.
In term of your funnel, i'd be making the inner out of stainless, the outer out of aluminium. Zeltic's is made that way, and despite being 6 foot high by 12 inches diameter, i can carry the outer funnel around on my shoulder quite happily. Standing on the cabintop and fitting it afloat isn't quite so easy though, hence wanting the whole thing to fold down as a single unit.
Hope these ideas help.
Daniel
Re: DetroiTug's Tug is going together
Posted: Wed May 25, 2011 8:54 pm
by artemis
I agree with most of what Dan said and you propose:
1. Make a standard hatch that is hinged on the after end to allow the funnel, etc. to be quickly lowered through the use of unions for pipes and slide coupling (just a length of thin walled pipe that is attached to the "upper" stack and will slide over the "lower" stack for a sleeve type junction).
2. "chinaman's cap" type shape for skirting - just looks nice & is traditional. Use cardboard box material to make a pattern for the cone. This also gives space in the far corners (probably aft corners in your case) to put a ventilator(s) to admit additional air to the engine room for the engineer. Bottom of skirting should be supported about 1" above hatch top by adequate straps/posts to allow for air flow.
3. Use your 12" dia, 3" high collar for the hole (top of collar about 1" above hatch cover top for weatherproofing) and to strap an adjustable clamp to the upper stack (about 3" above the sleeve coupling) to the hatch. It will be at a convenient height in the engine room to loosen clamp to the stack and slide the stack (with an outside ring that will sleeve over the boiler stack extension) inside the funnel a short distance to allow easy "hingeing"/lowering of the funnel/stack and alignment of the two stack pieces.
4. The large diameter "hole" allows for adequate air to:
(a). cool the inside of the funnel to stack space thus improving draft;
(b). bring in air for combustion on cold winter days (trust me, once your boiler is warm you'll be warm - even on freezing days - and cook on warm summer days. Experience on Oceanid during summer months. Engine room hatches, overhead skylight, and 16" throat diameter ventilators, all open full and it could easily get above 90F inside on an 75F August day on Puget Sound)
(c). prevent the stack from burning or charring of the hatch cover.
5. If possible attach the stay chains/wires for the stack to the hatch top and use hatch type clamps available from marine jewelry" (hardware) stores to firmly secure the hatch cover to the cabin top. You can probably make them up yourself if you've got one for pattern.
Buy a copy of "Boatbuilding" by Howard Chapelle, editions published in the 1940s - 1950s are best. If you had this, you wouldn't have many questions about location, size, height, dimensions, etc. of cabin goodies including the "drop" or "railway" windows. Most used book stores (online or off) carry it at very reasonable prices. Under $ 26 new at Amazon.
Re: DetroiTug's Tug is going together
Posted: Wed May 25, 2011 9:39 pm
by DetroiTug
Daniel,
Thanks for the input. It will be essentially as you've written, instead of a wood hatch cover with outer stack attached, it will be a metal hatch cover with outer stack attached.
Supporting the real stack internally is something I have considered as well.
Den, Those are great pics and wish I had seen them in my planning stages. Not sure I would have went that route, as those types windows are very complicated if installed properly with drain channels, etc. Also, with the swelling of wood, twisting of the hull, much clearance would be needed maintained for ease of operation, which will undoubtedly result in loose windows (depending on weather) in tracks and vibration noise. At this point it would add a lot of work/rework to add that type.
Ron, At your earlier suggestion, I picked up a copy of Chapelle's book, was reading it last night, great book, a little generalized, but informative. It concurs with my concerns with sliding windows (rattling/jamming). The center window in the wheelhouse will hinge outward, I found the bronze window hardware from an old New England Tug to do just that. The four windows in the cabin are only 16" X 16", there is a perfect nook under the deck next to the pilot house companionway to store them and also four framed screens of the same size to use in place of the windows. Michigan with over 11,000 inland lakes, is known for it's mosquitoes
Yes, I planned on adding cable stays with turnbuckles. I'm not sure exactly how I'll build all that, won't really know till I get to the weld table and start building it. That's how most things happen, just whatever hits me at the time.
-Ron
Re: DetroiTug's Tug is going together
Posted: Thu May 26, 2011 5:21 pm
by farmerden
Vibration?? Steam engines don't vibrate!

And hull twisting? Have you looked at your hull? I doubt it would ever twist-It was built by a master!! And yes they are complicated -with the little copper drains in the bottom to catch and expel the water. BUT!! Some of those windows have to open or you will cook! The plus side is that all those open boats shiver on the cold days and you will be warm and snug!

It's good to read all the advice you are getting but it's still up to you in the end and so far 10 outa 10! Den
Re: DetroiTug's Tug is going together
Posted: Sun May 29, 2011 12:18 am
by DetroiTug
Den,
You're probably right on the vibration and hull twisting.
The input and critique from others is nice, provides a better view of what to do next. The back wall of the wheelhouse comes to mind. That was great advice, and something I hadn't given much thought.
I just finished up the upper and lower sill for the windows in front of the wheelhouse. Ten individual pieces of red oak, put em' in, take em' out, put em' in, take em out... Sure glad I have battery drills for driving screws. They came out really good.
The mahogany window/door stock is at the wood millers shop, along with the cutters. He is going to mill up the stock, then all I have to do is assemble each component.
Tomorrow I'll trim out the aftercabin windows. Anybody have any ideas or have any pics of 1920's era cabin window trim? I'm thinking it's best kept simple, too fancy wouldn't look right.
-Ron
Re: DetroiTug's Tug is going together
Posted: Sun May 29, 2011 2:29 am
by farmerden
Oh I dunno Ron.Check out John Lanark's post under boilers from May 17th. Look in the back at the windows in his shop-Oh nothin' fancy! I can't afford them in my house letalone a shop! Oh those he'll probably say-someone was throwing them out! Sure,Sure
Den
Re: DetroiTug's Tug is going together
Posted: Sun Jun 05, 2011 9:53 pm
by DetroiTug
Ready to reinstall machinery...

-Ron